Baby Corn Pakoda

Baby Corn Pakoda in Marathi

Time: 15 minutes
Serves: 2 to 3 persons

baby corn snack, corn recipes, tea time snack, baby corn pakodaIngredients:
15 baby Corns
3 tbsp corn flour
1/4 tsp turmeric powder
1 tsp red chili powder
1/2 tsp cumin powder
1/2 tsp coriander powder
1/4 tsp amchoor powder
Salt to taste
Oil to deep fry

Method:
1) Take corn flour into a small bowl. add all the spices and salt. Mix well. Add 2 to 3 tbsp water and make medium consistency paste.
2) Wash and pat dry baby corns. Heat oil into a kadai. Turn the heat to medium high.
3) Dip the 3 to 4 baby corns into corn flour paste. Coat well. Leave the baby corns in hot oil. Deep fry till golden brown.
Serve hot with tomato ketchup.

बेबी कॉर्न पकोडा - Baby Corn Pakoda

Baby Corn Pakoda in English

वेळ: १५ मिनिटे
३ जणांसाठी

baby corn snack, corn recipes, tea time snack, baby corn pakodaLinkसाहित्य:
१५ बेबी कॉर्न
३ टेस्पून कॉर्न फ्लोअर
१/४ टिस्पून हळद
१ टिस्पून लाल तिखट
१/२ टिस्पून जिरेपूड
१/२ टिस्पून धणेपूड
१/४ टिस्पून आमचूर
चवीपुरते मिठ
तळणीसाठी तेल

कृती:
१) बेबी कॉर्न धुवून साफ कपड्याने पुसून घ्यावी.
२) कॉर्न फ्लोअर एका लहान वाडग्यात घ्यावे. त्यात सर्व मसाले आणि मिठ घालून मिक्स करावे. या मिश्रणात २ ते ३ टेस्पून पाणी घालून मध्यमसर भिजवावे.
३) कढईत तेल तापवावे. तेल व्यवस्थित तापले कि आच मध्यम करावी.
४) कॉर्न फ्लोअरच्या मिश्रणात ३ ते ४ बेबी कॉर्न घोळवून घ्यावी. गरम तेलात तळावीत. सोनेरी रंग येईस्तोवर तळावी. अशा प्रकारे सर्व बेबी कॉर्न तळून घ्यावीत.
टोमॅटो केचप बरोबर सर्व्ह करावीत.

Musk Melon Juice

Cantaloupe Juice in Marathi

Time: 10 minutes
Serves: 2 persons

healthy juice recipe, cantaloupe juice, musk melon juice, fruit juice recipeIngredients:
2 and ½ cup Cantaloupe, medium cubes (Tip)
½ cup Orange Juice
½ tsp lemon juice
½ tsp grated ginger
pinch of black salt
sugar to taste (optional)

Method:
1) Put all the ingredients except sugar in a blender and blend well.
2) Strain through a fine mesh strainer or strain using clean cotton cloth. Squeeze the remnant of cantaloupe.
3) Check the taste. To make the juice healthy, do not add sugar. However, add a tsp if you feel.
Chill the juice in the fridge and serve. To serve instantly, add couple of ice cubes.

Tips:
1) I had used readymade Orange juice, so i dint add any extra sugar. If you are using fresh oranges to make juice, use juicy sweet and sour oranges.
2) Use ripe and sweet cantaloupe. So that, you don’t have to add sugar. To make medium cubes, first cut the cantaloupe in two halves. Carve the core and remove seeds. Then divide each half into 6 to 8 wedges, peel and cut into cubes.
3) If you have juicer, making juice will be more easy.
4) Fresh herbs like mint, basil can be used to give nice flavor. Just crush 2-3 leaves and add while serving.

खरबूजाचा ज्युस - Cantaloupe Juice

Musk Melon (Kharbuja) Juice in English

A refreshing summer Drink - Musk Melon Juice

वेळ: १० मिनीटे
२ जणांसाठी
healthy juice recipe, cantaloupe juice, musk melon juice, fruit juice recipeसाहित्य:
२ ते अडीच कप खरबुजाच्या मध्यम फोडी (टीप)
१/२ कप संत्र्याचा ज्युस
१/२ टिस्पून लिंबाचा रस
१/२ टिस्पून किसलेले आले
किंचीत काळं मिठ
चवीपुरती साखर (ऐच्छिक)

कृती:
१) खरबुजाच्या फोडी, संत्र्याचा रस, लिंबू रस, आलं आणि थोडं काळं मिठ एकत्र करून मिक्सरमध्ये बारीक वाटून घ्यावे.
२) मोठ्या गाळण्याने किंवा स्वच्छ सुती कपड्याने व्यवस्थित गाळून घ्यावे. गाळण्यामध्ये जो चोथा उरला असेल तो दाब देऊन निट पिळून घ्यावा.
३) तयार ज्युसची चव पाहावी. शक्यतो साखर घालू नये, पण लागल्यास १ ते २ चमचे घालावी.
ज्युस फ्रिजमध्ये गार करावा किंवा लगेच प्यायचा असल्यास बर्फाचे २-३ तुकडे घालून सर्व्ह करावा.

टीपा:
१) मी रेडीमेड संत्र्याचा ज्युस वापरला होता, त्यामुळे साखर घालावी लागली नाही. पण जर तुम्ही घरीच संत्र्याचा रस काढणार असाल तर चांगली रसदार संत्री वापरावी तसेच थोडी साखर घालावी.
२) खरबुज व्यवस्थित पिकलेले व गोड असावे म्हणजे चव छान लागेल. खरबुज कापताना आधी दोन भाग करावे, बिया काढून टाकाव्यात, सालं काढावीत आणि गराच्या फोडी कराव्यात.
३) जर घरी ज्युसर असेल तर तो वापरून छान ज्युस होईल.
४) आवडत असल्यास फ्रेश हर्ब्स जसे पुदीना, बेसिल वगैरेची २-४ पाने चुरडून घालू शकतो.

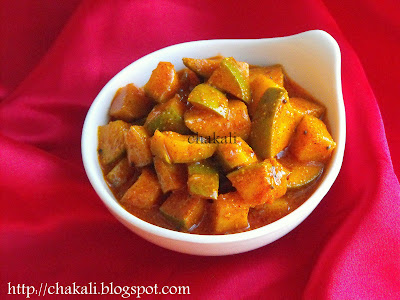
Green Mango Pickle

Mango Pickle in Marathi

Time: 15 minutes
Yield: 2 cups Pickle

green mango pickle, mango pickle, Indian mango pickle, ambyache lonache, ambyache lonche, aam ka achaarIngredients:
2 cups Raw Mango, small cubes (Stone removed)
1.5 tsp salt or to taste
1/2 tsp Hing (asafoetida)
1/4 to 1/2 tsp Fried fenugreek seed's powder (Step 2)
1 tbsp ground mustard seeds
2 tbsp red chili powder
For Tempering:- 4 tbsp Oil, 1/2 tsp mustard seeds, 1/2 tsp turmeric, 1/4 tsp hing

Method:
1) Wash green mangoes and pat dry well prior to dicing. Take cut mango into a bowl. Add salt, red chili powder and hing. Mix well and keep it covered for an hour.
2) Deep fry 12 to 15 fenugreek seeds. Crush into mortal and pastel.
3) Heat oil in a small tadka pan. Add mustard seeds, hing, turmeric powder. Transfer this tadka to a small steel or glass bowl.
4) After an hour add fenugreek powder, mustard seeds powder and prepared tadka (at room temp.)
Store this pickle into a glass jar with tight lid.

Tips:
1) Some people like to have extra amount of masala. For that, prepare 2 tbsp more tadka and also increase amount of ground mustard seeds.
2) Fenugreek seeds have bitter taste. If added in moderate amount, it gives nice flavor. But if added more than needed, it will make the pickle taste bitter. Hence, add 1/4 tsp first and mix. Taste the pickle. Add remaining fenugreek powder only if you like.
3) Adjust the salt to taste.
4) I had used 2 tbsp red chili powder from that 1/2 tsp was Kashmiri red chili powder and the remaining was normal red chili powder. Kashmiri red chili powder gives bright red color.
5) A tbsp of "split yellow mustard seeds" can be added along with ground mustard seeds. Split mustard seeds taste good as well as look very nice if this pickle.

कैरीचे लोणचे - Kairiche Lonche

Mango Pickle in English

वेळ: १५ मिनीटे
साधारण २ कप लोणचे

green mango pickle, mango pickle, Indian mango pickle, ambyache lonache, ambyache lonche, aam ka achaarसाहित्य:
२ कप कैरीच्या लहान फोडी (३ लहान कैर्‍या)
दिड टिस्पून मिठ
१/२ टिस्पून हिंग
१/४ ते १/२ टिस्पून तळलेल्या मेथी दाण्याची पावडर (स्टेप २)
१ टेस्पून मोहोरी पावडर
२ टेस्पून लाल तिखट
फोडणीसाठी: ४ टेस्पून तेल, १/२ टिस्पून मोहोरी, १/२ टिस्पून हळद, १/४ टिस्पून हिंग

कृती:
१) कैर्‍या धुवून निट कोरड्या करून मगच त्याच्या फोडी कराव्यात. कैरीच्या फोडींना तासभर मिठ, लाल तिखट आणि हिंग लावून ठेवावे.
२) १२-१५ मेथी दाणे तेलात तळून घ्यावे. खलबत्त्यात कुटून बारीक पूड करावी.
३) कढल्यात तेल गरम करून त्यात मोहोरी, हिंग, आणि हळद घालून फोडणी करावी. हि फोडणी एखाद्या काचेच्या किंवा स्टीलच्या वाटीत काढून गार होवू द्यावी.
४) कैरीच्या फोडींमध्ये मेथीपूड, मोहोरी पूड आणि गार झालेली फोडणी घालून मिक्स करावे.
हे लोणचे लहान काचेच्या बरणीत भरून ठेवावे.

टीपा:
१) जर खार जास्त हवा असेल तर थोडी मोहोरी पावडर घालावी.
२) मेथीची पावडर आधी १/४ टिस्पूनच टाकावी. २-३ तासांनी चव पाहून जर लागली तर अजून थोडी घालावी.
३) मिठाचे प्रमाणही आवडीनुसार कमी किंवा जास्त करता येईल.
४) मी २ टेस्पून लाल तिखटापैकी १/२ टेस्पून तिखट हे रंगाचे (काश्मिरी) लाल तिखट वापरले होते व उरलेले दिड टेस्पून साधं तिखट वापरलं होतं.
५) वरील लोणच्यात मोहोरी पावडर बरोबर थोडी मोहोरीची डाळ वापरल्यास लोणचे दिसायला आणि चवीलाही छान होते.

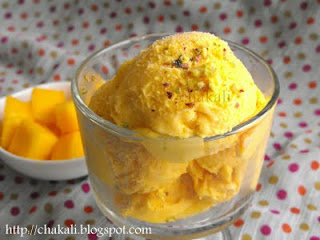
Homemade Mango Icecream

Mango Icecream in Marathi

Time: 30 to 35 minutes
Serves: 8 people

homemade icecream recipe, how to make ice cream at home, easy ice cream recipeIngredients:
1 cup Heavy whipping Cream, chilled
2 cup Mango Pulp chilled (I used ready-made sweetened pulp)
1/2 cup powdered Sugar
Cardamom Powder (Optional)

Mango ice cream recipe, homemade mango ice cream, vanilla ice cream recipeMethod:
1) Take a big glass bowl and refrigerate it for half an hour before whipping the cream.
2) Pour the cold heavy whipping cream into chilled glass bowl. Using hand mixer, whisk the cream.
3) When cream starts becoming fluffy, add sugar in 2-3 batches and keep whisking. Do not whisk once cream becomes nicely fluffy. Over-whipped cream will begin to separate and curdle, and then turn to butter.
4) Add chilled mango pulp to whipped cream and fold with spatula. Also add cardamom powder or any other flavor (vanilla, mango etc) at this point. Mix nicely.
5) If you have ice-cream machine, churn the mixture as per the instructions written in the manual.
6) If you don't have ice-cream machine:-
i) Pour the mixture into a freezer safe plastic or metal container (Metal pan used for baking work too). Freeze the ice-cream mixture for an couple of hours. Then Remove it from freezer. Wait till it loosens a bit. Grind in a grinder for couple of minutes. Again freeze the mixture. Repeat this process for atleast 3-4 times to get smooth consistency.

Tips:
1) Home squeezed Alfonso mango pulp can be used instead of ready-made pulp. Squeeze out the pulp and strain through a strainer to get smooth pulp. Also, you need to add some more sugar as homemade pulp is not as sweet as ready-made one.
2) Roasted Khoya tastes great and gives nice texture. So add around 1/2 to 3/4 cup of khoya to the ice-cream mixture.
3) Chopped pistachio, almonds give a nice crunch.
4) Add small mango pieces after final grinding.

मँगो आइसक्रीम - Mango Ice cream

Mango Icecream in English

A delicious Homemade Mango Ice-cream.

वेळ: ३० ते ३५ मिनीटे
८ जणांसाठी

Mango Icecream, how to make Icecream at home, eggless icecream, creamy ice creamसाहित्य:
१ कप हेवी व्हिपींग क्रिम, थंडगार
२ कप आंब्याचा रस, थंडगार (मी रेडीमेड कॅन मधील साखर असलेला आंबा रस वापरला होता)
१/२ कप पिठी साखर
वेलचीपूड (ऐच्छिक)

homemade delicious mango icecream, whipping cream, mango pulp, heavy whipping creamकृती:
१) एक मध्यम आकाराचे खोलगट काचेचे बोल घ्या आणि १/२ तास फ्रिजमध्ये गार करण्यास ठेवा.
२) गार झालेले काचेचे बोल घेऊन त्यात गार व्हिपींग क्रिम घाला आणि हॅण्ड मिक्सरने जास्त स्पिडवर फेटा.
३) क्रिम थोडे फ्लफी व्हायला लागले कि २ ते ३ बॅचमध्ये साखर घालून फेटत राहा. क्रिम व्यवस्थित फ्लफी झाले कि फेटणे थांबवावे. गरजेपेक्षा जास्त फेटल्याने क्रिम पिवळसर होवून त्यातील स्निग्धांश (fat content) विलग होतो.
४) यामध्ये आता थंड आंब्याचा रस घालून लाकडी कालथ्याने फोल्ड करा. वेलचीपूड घालणार असल्यास आता घाला. किंवा त्याऐवजी तुम्हाला मँगो एसेन्स घालायचा असल्यास २ -३ थेंब घाला. निट मिक्स करा.
५) जर तुमच्याकडे आइसक्रिम मशिन असेल तर त्यात हे मिश्रण घालून घोटवा.
६) जर आईसक्रिम मशिन नसेल तर हे मिश्रण फ्रिझर सेफ प्लास्टिक किंवा फ्रिझर सेफ मेटलच्या भांड्यात घाला (बेकिंगसाठी जे मेटलचे भांडे वापरतात तेही चालेल). साधारण २ तास हे मिश्रण फ्रिजमध्ये ठेवा. नंतर फ्रिजरमधून काढा. आईसक्रिम भांड्याच्या कडेने सुटेस्तोवर थांबा. नंतर हे गोठलेले मिश्रण मिक्सरमध्ये काही मिनीटे ब्लेंड करा. परत भांड्यात ओतून १-२ तास फ्रिजमध्ये ठेवा. २ तासांनी परत मिक्सरमध्ये फिरवा. असे किमान ३ ते ४ वेळा करा म्हणजे आईसक्रिम स्मूथ लागेल.

टीपा:
१) रेडीमेड आमरसाऐवजी घरी बनवलेला हापूस आंब्याचा रसही वापरता येईल. फक्त आमरस चाळणीतून गाळून घ्यावा म्हणजे गुठळ्या किंवा आंब्यातील धागे निघून जातील. तसेच घरगुती आमरस वापरल्यास जास्त साखरही घालावी लागेल तेव्हा चव पाहून साखर घालावी.
२) भाजलेला खवाही आईसक्रिममध्ये वापरू शकतो. वरील प्रमाणासाठी १/२ ते १ कप खवा वापरावा.
३) बारीक चिरलेले बदाम पिस्ताही घालू शकतो.
४) ३-४ वेळा मिक्सरमध्ये मिश्रण ब्लेंड केल्याव शेवटी जेव्हा आईसक्रिम सेट करण्यास ठेवाल त्यावेळी आंब्याचे साल काढून बारीक तुकडे मिश्रणात घालू शकता, छान लागतात.

Spinach Rice

Spinach Rice in Marathi

Time: 30 minutes
Serves: 2 persons

spinach rice, palak rice, Healthy spinach riceIngredients:
3/4 cup basmati rice
1 cup finely chopped spinach
3/4 cup hot water
1 tbsp butter
1/4 tsp cumin seeds
1 tsp finely chopped ginger
1 tsp finely chopped garlic
1/2 cup chopped onion
1 small green chili
Whole spice: 2 bay leaves, 1 cardamom, 2 cloves
Salt to taste

Method:
1) Soak rice in water for 10 minutes. Drain the water after 10 minutes. Leave the rice for 10 minutes.
2) Add 1/2 cup of water to spinach and puree.
3) Heat 1 tbsp butter into a deep nonstick saucepan. Add cumin seeds, whole spices. Saute for 5 seconds. Add ginger garlic and green chili.
4) Add soaked rice. Roast for few minutes over high heat. Stir continuously to avoid burning the rice. You will notice that rice has become completely dry and rice grains are popping when touched directly to the pan's bottom. That means rice is roasted perfectly.
5) Add 3/4 cup hot water, salt and spinach puree. Keep the flame on high. Boil until you don't see water on the surface of rice. Then put the flame on medium low and cover the pan. Cook for 8 to 10 minutes or until rice is cooked completely.
Fluff with a fork. Serve hot with raita and fryums/ papad.

Tips:
1) To make this rice more healthy and colorful, add vegetables like peas, carrot, french beans, cauliflower etc
2) Roasting rice helps to keep the grains separate after cooking. Also, use hot water and follow step 5 for better results.
3) Kids would love to eat this green rice. Do not add green chili to make it kids friendly.

पालक राईस - Palak Rice

Spinach Rice in English

वेळ: ३० मिनीटे
वाढणी: २ जणांसाठी

spinach rice, palak rice, Healthy spinach riceसाहित्य:
३/४ कप बासमती तांदूळ
१ ते दिड कप बारीक चिरलेली पालकाची पाने + १/२ कप पाणी
३/४ कप गरम पाणी
१ टेस्पून बटर
१ टिस्पून बारीक चिरलेले आले
१ टिस्पून बारीक चिरलेले लसूण
१/२ कप बारीक चिरलेला कांदा
१ लहान हिरवी मिरची
आख्खे गरम मसाले - २ तमालप्रत्र, १ हिरवी वेलची, २ लवंगा
चवीपुरते मिठ

कृती:
१) तांदूळ साध्या पाण्यात १० मिनीटे भिजवून ठेवावा. १० मिनीटांनी पाणी काढून टाकावे. आणि हा तांदूळ १० मिनीटे निथळत ठेवावा.
२) १/२ कप साधं पाणी आणि पालक एकत्र करून बारीक प्युरी करून घ्यावी.
३) नॉनस्टीक पॅनमध्ये १ टेस्पून बटर किंवा तूप गरम करावे. त्यात जिरे आणि आख्खे मसाले घालावे. ५ ते १० सेकंद परतून आले-लसूण आणि मिरची घालावी.
४) निथळत ठेवलेला तांदूळ आता घालून व्यवस्थित कोरडा होईस्तोवर परतावा. सतत परतत राहा म्हणजे तांदूळ जळणार नाही. तांदूळ पूर्ण कोरडा झाला पाहिजे आणि व्यवस्थित भाजला गेला पाहिजे.
५) ३/४ कप गरम पाणी, मिठ आणि पालकाची प्युरी घालून मोठ्या आचेवर भात शिजू द्यावा. भाताच्या पृष्ठभागावर (सरफेस) पाणी दिसायचे बंद झाले कि लगेच आच मिडीयम आणि लो च्यामध्यावर ठेवावी तसेच पॅनवर झाकण ठेवावे. साधारण १० मिनीटे वाफ काढावी.
भात तयार झाला कि काट्याने (fork) हलकेच मोकळा करून घ्यावा. गरम भात रायते आणि पापडाबरोबर सर्व्ह करावा.

टीपा:
१) भात अधिक पौष्टिक बनवण्यासाठी मटार, गाजर, फरसबी अशा भाज्याही घालू शकतो.
२) तांदूळ चांगला भाजला गेल्याने भात मोकळा होतो. तसेच भात मोकळा होण्यासाठी गरम पाणी वापरावे आणि स्टेप क्र. ५ चे नक्की अवलंबन करावे.
३) लहान मुलांना हा भात नक्की आवडेल. वाटल्यास मिरची घालू नये.

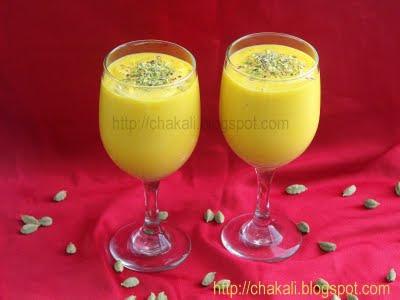
Mango Lassi

Mango Lassi in Marathi

Time: 10 minutes
Servings: 2

mango lassi, sweet lassi, khari lassi, Indian bevaragesIngredients:
3/4 cup Milk
1 cup Yogurt
3/4 cup Mango Pulp (I used readymade mango pulp)
4 tbsp Sugar
1/4 tsp Cardamom powder
Crushed Pistachios for garnishing

Method:
1) Add milk, yogurt, mango pulp, sugar and cardamom powder to a blender. Blend until mixed well.
Pour into 2 serving glasses. Garnish lassi with pistachios and serve chilled.

Tips:
1) Readymade mango pulp was already sweetened. Therefore I used only 4 tbsp of sugar. Mango pulp can be prepared at home. Use good quality Alfonso mangoes. Peel and remove stone. Puree into blender and then strain. Follow the same method given above. Add some more sugar, as homemade pulp is not that sweet.
2) Use full fat plain yogurt for better results. Yogurt made at home is preferable. Readymade lowfat or fat-free yogurt has gooey texture which ruins the taste and texture of lassi.
3) Adjust the consistency to your own preference by increasing or reducing amount of milk.

मँगो लस्सी - Mango Lassi

Mango Lassi in English

२ जणांसाठी
वेळ: १० मिनीटे

mango lassi, sweet lassi, khari lassi, Indian bevaragesसाहित्य:
३/४ कप दुध
१ कप दही
३/४ कप आंब्याचा रस (मी कॅनमधील रेडीमेड मँगो पल्प वापरला होता)
४ टेस्पून साखर
१/४ टिस्पून वेलचीपूड (ऐच्छिक)
सजावटीसाठी बदाम पिस्त्याचा भरडसर चुरा

कृती:
१) दुध, दही, मँगो पल्प, साखर आणि वेलचीपूड एकत्र मिक्सरमध्ये व्यवस्थित ब्लेंड करून घ्यावी.
२ सर्व्हींग ग्लासेसमध्ये लस्सी ओतावी. वरून पिस्ता बदामची पूड घालून सजवावे. फ्रिजमध्ये गार करावी आणि मग सर्व्ह करावी.

टीपा:
१) रेडीमेड मँगो पल्पमध्ये बर्‍यापैकी साखर असते. म्हणून ४ टेस्पून साखर वापरली आहे. घरी आमरस बनवून तोही लस्सी साठी वापरता येतो. भरपूर गर असलेले २ हापूस आंबे घ्यावे. साल आणि आतील कोय काढावी. गर मिक्सरमध्ये बारीक वाटावा. जर गरामध्ये आंब्यातील तंतू असतील तर रस गाळून घ्यावा. आणि वरील कृतीप्रमाणे लस्सी बनवावी. आमरस घरी बनवल्याने लस्सीमध्ये साखर अजून घालावी लागेल.
२) शक्यतो पूर्ण स्निग्धांश (Full Fat) असलेले दही वापरावे. घरी विरजले असल्यास उत्तम. ग्रोसरी स्टोअर्समध्ये जे low fat किंवा Fat Free दही मिळते त्याचे टेक्स्चर कधीकधी गुळगुळीत असते त्यामुळे लस्सी चांगली लागत नाही.
३) लस्सीचा पातळ-घट्टपणा आवडीनुसार ठेवावा. त्याप्रमाणे दुधाचे प्रमाण कमी किंवा जास्त करावे.

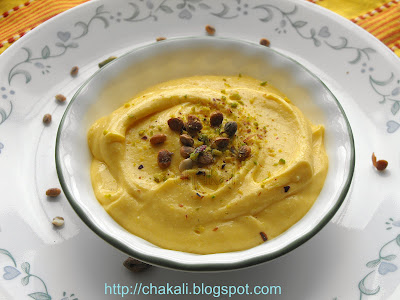
Amrakhand

Amrakhand in Marathi

Time: 30 minutes
Serves: 5 to 6 people

amrakhand, sweets, shrikhand puri, Gudhi padva

Ingredients:
32 OZ cup of "Chobani" plain Greek Yogurt OR 1/2 kg chakka
3/4 to 1 cup mango pulp (I had used sweetened mango pulp)
1 cup sugar
1/2 tsp Cardamom powder
2 tbsp Charoli (Chironji)
2 tbsp Pistachio, finely chopped

Method:
1) Hang Greek yogurt into a muslin cloth for about 8 to 10 hours or until all the water content drips out.
2) Take the pressed yogurt (chakka) into a big mixing bowl. Add 1/2 cup mango pulp and 1/2 cup sugar. Mix well. Leave it for 15 minutes until sugar dissolves. Check the taste. If you want more sweetness and mango flavor, add mango pulp. Add some sugar if needed. Churn it through Pooran Machine.
3) Add cardamom powder, charoli and pistachio. Chill in the refrigerator and serve with puri.

Tips:
1) Do not add entire amount of mango pulp and sugar. Once sugar dissolves in chakka, the consistency loosens. Therefore check the consistency and add sugar and mango pulp accordingly.
2) Fresh Alfonso mango pulp (homemade) can be used instead of canned mango pulp. In that case, you will have to add more sugar.
3) If you are using granulated sugar, you might not need to grind the chakka-sugar mixture through pooran machine.
4) Cardamom powder can be substituted by nutmeg powder.
5) Nuts other than pistachio like cashews, almonds can be added at your choice

आम्रखंड - Amrakhand

!! अक्षय तृतीयेच्या हार्दिक शुभेच्छा !!

Amrakhand in English

वेळ: ३० मिनीटे
५ ते ६ जणांसाठी

amrakhand, sweets, shrikhand puri, Gudhi padvaसाहित्य:
३२ OZ चोबानी प्लेन ग्रिक योगर्ट किंवा १/२ किलो चक्का
३/४ ते १ कप आंब्याचा रस (मी कॅनमधील मँगो पल्प वापरला होता)
१ कप साखर
१/२ टिस्पून वेलची पावडर
२ टेस्पून चारोळी
२ टेस्पून पिस्ता, जाडसर पूड करावी किंवा पातळ काप करावे

कृती:
१) ग्रिक योगर्ट सुती कपड्यात बांधून ८ ते १० तास त्यातील पाण्याचा अंश जाईस्तोवर लटकवून ठेवा. खाली एखादे पसरट भांडे ठेवा म्हणजे गळलेले पाणी त्यात जमा होईल.
२) तयार चक्का मोठ्या मिक्सिंग बोलमध्ये घ्यावा. त्यात १/२ कप आंब्याचा रस आणि १/२ कप साखर घाला. मिक्स करून १५ मिनीटे साखर विरघळण्यासाठी तसेच ठेवून द्या. परत चमच्याने घोटून चव पाहा. जर आंब्याचा फ्लेवर तसेच गोडपणा हवा असेल तर आवडीप्रमाणे आंब्याचा रस आणि साखर घाला. नंतर पूरणयंत्रातून हे मिश्रण फिरवून घ्या.
३) यात वेलचीपूड, चारोळी, पिस्ता घालून मिक्स करा. फ्रिजमध्ये थंड करण्यास ठेवा आणि पुर्‍यांबरोबर सर्व्ह करा.

टीपा:
१) चक्क्यामध्ये एकाचवेळी सर्व आंब्याचा रस आणि साखर घालू नये. साखर चक्क्यात विरघळली कि चक्का थोडा पातळ होतो. तसेच आंब्याच्या रसाचा पातळपणा आहेच. म्हणून बेताबेताने आंबारस आणि साखर घालून चव पाहावी. आणि गरजेनुसार जिन्नस वाढवावे.
२) घरी काढलेला हापूस आंब्याचा रस रेडीमेड आमरसाऐवजी वापरू शकतो. हा रस पाणी न घालता मिक्सरमध्ये बारीक करावा आणि गाळून घ्यावा. तसेच वरील प्रमाणापेक्षा जास्त साखर घालावी लागेल.
३) किंचीत भरड ठेवलेली साखर किंवा ग्रॅन्युलेटेड शुगर वापरल्यास कदाचित चक्का-साखर पूरणयंत्रातून बारीकही करावे लागणार नाही. फक्त एकदम बारीक पिठी साखर शक्यतो वापरू नये, श्रिखंडाचे टेक्श्चर बदलते.
४) वेलचीऐवजी जायफळ पूडसुद्धा वापरू शकतो.
५) पिस्त्याबरोबर बदाम काजू ही घातले तरी छान लागतात.

Spinach Cheese Sandwich

Spinach corn Sandwich in Marathi

Time: 15 minutes
Serves: 5 Sandwiches

Spinach sandwich, spinach corn sandwich, spinach cheese sandwichIngredients:
2.5 cups finely chopped Spinach (important tip)
1/4 cup Sweet corns
2 Garlic cloves, peeled and finely chopped
1 Green chili, finely chopped
1 tsp Butter (will need some more for roasting)
1/2 cup shredded cheese (Tip 2)
Salt to taste
10 bread slices

Method:
1) Heat butter into a pan. Add green chili, and garlic. Saute for 10 seconds. Then add spinach and corns.
2) Add salt and cook uncovered until water content in spinach evaporates.
3) Divide the spinach stuffing in 5 equal portions. Spread 1 portion of stuffing evenly, over a bread slice. Sprinkle generous amount of cheese. Cover with another slice of bread.
4) Toast in Sandwich toaster. OR Roast it in a shallow pan or tawa. Apply some butter on the surface. Roast over medium flame.
Cut into half and serve with tomato ketchup.

Tips:
1) Chop spinach finely. Also, spinach tend to reduce in size after stir frying. So add very little salt, may be one or two pinches. Do not cover the pan to keep the green color of spinach.
2) Add generous amount of cheese. Spinach and cheese tastes amazing together.
3) When preparing sandwiches for kids, do not add chili or add very little.

पालक कॉर्न चिज सॅंडविच - Spinach Corn and cheese Sandwich

Spinach Cheese Sandwich in English

This is a delicious quick breakfast recipe and is equally healthy. You consume quite a good amount of spinach, when you eat 1 sandwich. If eaten moderately, cheese is very good for health as 1 cheese slice has goodness of 1 glass of milk. It's rich in vitamin B and calcium. Try light cheese for less fat and calorie content.


५ सॅंडविचेस
वेळ: १५ मिनीटे

Spinach sandwich, spinach corn sandwich, spinach cheese sandwichसाहित्य:
अडीच कप बारीक चिरलेला पालक
१/४ कप मक्याचे उकडलेले दाणे
२ मोठ्या लसूण पाकळ्या, सोलून बारीक चिरलेल्या
१ हिरवी मिरची, बारीक चिरून
१ टिस्पून बटर (+ अजून थोडे सॅंडविच भाजण्यासाठी)
१/२ कप किसलेले चिज
चवीपुरते मिठ
१० ब्रेडचे स्लाईस

कृती:
१) कढईत १ टिस्पून बटर गरम करावे. त्यात हिरवी मिरची, लसूण घालून १० सेकंद परतावे. नंतर पालक आणि मक्याचे दाणे घालावे.
२) पालक घातल्यावर लगेच मिठ घालावे आणि झाकण न ठेवता पालकातील पाण्याचा अंश निघून जाईस्तोवर परतावे.
३) मिश्रण ५ समभागात विभागून घ्यावे. एका ब्रेड स्लाईसवर १ भाग मिश्रण पसरवावे. त्यावर बर्‍यापैकी चिज घालावे. वरून दुसरा ब्रेड ठेवून सॅंडविच तयार करावे.
४) सॅंडविच टोस्टरमध्ये सॅंडविच टोस्ट करावे. किंवा तव्यावर थोडे बटर घालून मध्यम आचेवर सॅंडविच दोन्ही बाजूंनी खरपूस करून घ्यावे. चिज वितळू द्यावे.
सुरीने दोन भाग करावे. टोमॅटो केचपबरोबर सर्व्ह करावे.

टीपा:
१) पालक एकदम बारीक चिरावा. तसेच पालक शिजला कि आकाराने आळतो. त्यामुळे मिठ अगदी थोडे घाला (२ चिमटी). पालक परतताना कढईवर झाकण ठेवू नये, पालकाचा रंग काळपट होतो.
२) चिज भरपूर घाला. पालक आणि चिज यांचे कॉंबिनेशन फार छान लागते. तसेच, जर चिज कमी घातले तर नुसता पालक आणि ब्रेड खुप चांगले लागत नाही.
३) लहान मुलांसाठी बनवताना मिरची घालू नये.