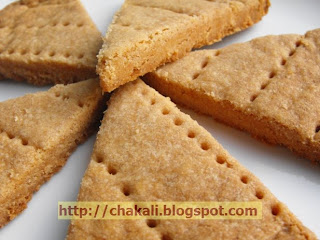
Short Bread in English
साहित्य:
५ १/२ टेस्पून बटर
१/४ कप साखर (सुपरफाईन)
१/२ कप + १/८ कप मैदा
१/४ कप तांदूळ पिठ
१/८ टिस्पून बेकिंग पावडर
चिमूटभर मिठ
कृती:
१) मैदा, तांदूळ पिठ, बेकिंग पावडर आणि मिठ हे सर्व एकत्र करून ५ वेळा चाळून घ्यावे ज्यामुळे सर्व जिन्नस एकसारखे मिक्स होतील.
२) मऊसर बटर आणि साखर एकत्र करून हॅण्डमिक्सरने फेसून घ्यावे. हे मिश्रण अगदी हलके झाले पाहिजे. साधारण ८ ते १० मिनीटे फेसावे.
३) ओव्हन ३२५ degree F वर प्रिहिट करावा. फेसलेल्या मिश्रणात हळूहळू चाळलेले पिठ घालून हॅण्डमिक्सरने एकत्र करून घ्यावे. मिश्रण नरमसर आणि हलके झाले पाहिजे.
४) ओव्हनसेफ भांड्यात (pie bakeware) या मिश्रणाचा १/२ इंचाचा थर द्यावा. थराचा पृष्ठभाग समान असावा. सुरीने अलगदपणे आवडीच्या शेपमध्ये आधीच कापून त्याच्या खुणा करून ठेवाव्यात. मिश्रण बेक केल्यावर कडक होईल आणि तेव्हा जर सुरीने कापले तर शॉर्ट ब्रेडचा चुरा पडेल.
५) मिश्रण ३० ते ३५ मिनीटे किंवा शॉर्ट ब्रेडचा रंग लाईट ब्राऊन होईस्तोवर बेक करावे. बेक करून झाले कि सुरीने ज्या खुणा केल्या आहेत, तिथून परत एकदा सुरी फिरवावी. शॉर्ट ब्रेड थंड होवू द्यावे. थंड झाल्यावर वेगळे करावेत.
Labels:
Short bread, Nankhatai, nankatai, shortbread cookie recipe
Short Bread (Nankhatai)
Short Bread in Marathi
Ingredients:
5 tbsp Unsalted Butter
1/4 cup Sugar (Superfine)
1/2 cup All Purpose Flour
1/4 cup Rice Flour
1/8 tsp Baking Powder
Pinch of salt
Method:
1) Sift All Purpose flour, Rice flour, Baking powder and salt five times.
2) Put soft butter in bowl and add sugar to it. beat them with Hand mixer until the mixture become frothy and smooth (approximately 8 minutes).
3) Now preheat oven at 325 degree F. Add sifted flours slowly to frothy butter mixture and mix well. Remove lumps. Mixture should be soft and light.
4) Grease an ovensafe container (Pie bakeware). Put Short Bread Mixture in it and make 1/2 inch layer, spread the dough evenly. Make the surface plain.
5) Using a sharp knife, give shallow marks gently without disturbing the dough and cut in any shape you prefer. When we bake short bread dough, it will become hard and crispy. If we cut short breads after baking it will crumble while making pieces.
6) Bake about 30-35 minutes or until color changes to light brown. Remove from oven and cool to the room temperature.
7) Using sharp knife start cutting gently, where you had made marks on the dough. Separate the pieces.
Labels:
Short bread, Nankatai recipe, shortbread cookie, nanakhatai
टोमॅटोची भाजी - Tomato Bhaji
Tomato Bhaji (English Version)
साहित्य:
२ मध्यम टोमॅटो, बारीक चिरून
१/२ कप चिरलेला कांदा
१ टेस्पून तेल
फोडणीसाठी: १/४ टिस्पून जिरे, चिमूटभर हिंग, १/८ टिस्पून हळद, २-३ कढीपत्ता पाने
२ ते ३ हिरव्या मिरच्या, उभ्या चिरून
१/२ टिस्पून आले पेस्ट
१ टिस्पून गुळ
चवीनुसार मिठ
१ टेस्पून कोथिंबीर
कृती:
१) कढईत तेल गरम करून जिरे, हिंग, हळद, कढीपत्ता आणि मिरच्या घालून फोडणी करावी. आले पेस्ट घालून काही सेकंद परतावे. त्यात चिरलेला कांदा घालावा. थोडे मिठ घालून कांदा परतून घ्यावा.
२) कांदा निट शिजला कि त्यात चिरलेला टोमॅटो घालून ढवळावे. मध्यम आचेवर झाकण ठेवून टोमॅटो शिजू द्यावा.
३) टोमॅटो अर्धवट शिजला कि त्यात गूळ घालावा. निट मिक्स करून टोमॅटो शिजू द्यावा. गरजेनुसार मिठ घालावे. कोथिंबीर घालावी.
तयार भाजी गरम गरम पोळीबरोबर सर्व्ह करावी.
Labels:
Tomato Curry, Indian Tomato Curry, Tomatochi bhaji, Sweet and sour Tomato Curry
Tomato Sabzi
Tomato bhaji (Curry)
Ingredients:
2 medium Tomatoes, finely chopped
½ cup chopped Onion
1 tbsp Oil
For Tempering: ¼ tsp Cumin seeds, pinch of Asafoetida, 1/8 tsp Turmeric Powder, 2-3 Curry leaves
2-3 Green Chilies, finely chopped
½ tsp Ginger paste
1 tsp Jaggery
Salt to taste
1 tbsp Cilantro, for garnishing
Method:
1) Heat a wok; add oil. Let oil become hot. Then temper with Cumin seeds, Asafoetida, Turmeric, curry leaves and green chilies. Add Ginger paste and sauté for few seconds. Then put chopped Onion and sauté. Let it cook until translucent. Add little salt while sautéing Onion.
2) Once onion is cooked, add chopped Tomatoes and stir well. On medium heat, let the tomato cook.
3) Add Jaggery once Tomato is half done. Mix nicely and let it cook for a while. Add salt if required. Garnish with Cilantro
Serve Tomato curry with hot Chapatis.
Labels:
Tomato Curry, Indian Tomato Curry, Tomatochi bhaji, Sweet and sour tomato curry.
शेजवान सॉस - Schezwan Sauce
Schezwan Sauce in English
वाढणी : साधारण अर्धा कप
हा शेजवान सॉस चायनिज स्टर फ्राईड वेजिटेबल्स बरोबर सर्व्ह करावा तसेच इतर चायनिज पदार्थातही याचा वापर करता येतो.
साहित्य:
१ टिस्पून लसूण पेस्ट
२ टिस्पून चिरलेले लसूण
२ टेस्पून पाती कांदा
१ टेस्पून पाती कांद्याची पाती
१ टेस्पून चिरलेली कोथिंबीर
१ टेस्पून चुरडलेल्या लाल मिरच्या
दिड टेस्पून लाल तिखट
१/३ कप टोमॅटो प्युरी
१ टेस्पून सोया सॉस
दिड टेस्पून व्हिनेगर
२ टेस्पून तेल
१ टिस्पून कॉर्न फ्लोअर
१/४ टिस्पून साखर
१/४ टिस्पून मिरपूड
चवीनुसार मिठ
शेजवान सॉस याही पद्धतीने करता येईल - Schezwan Sauce
कृती:
१) कढईत तेल गरम करावे. त्यात लसूण फोडणीस घालावे, थोडा रंग बदलला पाती कांदा, कोथिंबीर आणि चुरडलेल्या लाल मिरचीची पूड घालून मिक्स करावे. १ ते २ मिनीटे परतावे.
२) नंतर लाल तिखट, टोमॅटो प्युरी, सोया सॉस, व्हिनेगर घालून निट मिक्स करावे. साखर, मिरपूड आणि मिठ घालावे. सर्व एकत्र ढवळून घ्यावे.
३) १ टिस्पून कॉर्न फ्लोअरमध्ये २ टेस्पून पाणी घालावे आणि मिक्स करावे. हे मिश्रण सॉसमध्ये घालावे व ढवळून मध्यम आचेवर १-२ मिनीटे उकळू द्यावे.
सॉस दाटसर झाला कि गॅसवरून उतरवावा. वरून चिरलेल्या पाती घालून मिक्स करावे.
टीप:
१) हा सॉस खुप तिखट असतो त्यामुळे वापरताना गरजेपुरताच वापरावा किंवा लाल तिखटाचे प्रमाण कमी करावे.
२) उरलेला शेजवान सॉस लहान डब्यात भरून फ्रिजमध्ये ६-७ दिवस सहज टिकतो.
Labels:
Schezwan Sauce, szechwan, Sichuan sauce, Chinese Food
Schezwan Sauce
Schezwan Sauce
Serves: approx ½ cup
Serve this Schezwan Sauce with Chinese Stir Fried Vegetables
Ingredients:
1 tsp Garlic Paste
2 tsp finely chopped Garlic
2 tbsp finely chopped Spring Onion
1 tbsp Green part of Spring Onion
1 tbsp Cilantro, finely chopped
1 tbsp Crushed Red Chili
1 ½ tbsp Red Chili Powder
1/3 cup Tomato Puree
1 tbsp Soy Sauce
1½ tbsp Vinegar
2 tsp Oil
1 tsp Corn Flour
¼ tsp Sugar
¼ tsp Pepper Powder
Salt to taste
Try another recipe of Schezwan Sauce
Method:
1) In a wok or nonstick saucepan, heat oil. Add Garlic paste and chopped garlic. Wait until color changes to light brown, then add spring Onion, Cilantro and crushed red Chili. Stir well and sauté for 1 or 2 minutes.
2) Then add Red chili powder, Tomato Puree, Soy Sauce, Vinegar and mix nicely. Add Sugar, Black Pepper and salt to taste. Combine nicely.
3) In a small bowl add 1 tsp Corn flour and 2 tbsp water, mix well and pour this mixture to the sauce. Mix properly and let it cook on medium low heat for about 1-2 minutes.
4) Once Sauce become thick, remove pan from heat. Garnish with Green part of Spring Onion.
Note:
1) This sauce is very hot in taste. So use it very carefully or you can reduce the amount of Red chili Powder.
2) Refrigerate the remaining sauce in an airtight container. It remains good for 6-7 days.
Labels:
Schezwan Sauce, szechwan, Sichuan sauce, Chinese Food
चायनिज स्टर फ्राय वेजिटेबल विथ राईस - Chinese Stir fried vegetables with Rice
Chinese Stir Fried Vegetable with white Rice (English Version)
वाढणी : २ जण
साहित्य:
::::भातासाठी::::
पाउण कप बासमती तांदूळ
दिड ते दोन कप पाणी
चवीपुरते मिठ
१ चमचा तेल
::::भाजीसाठी::::
दिड ते पाऊणेदोन कप भाज्या (गाजर, कांदा, भोपळी मिरच्या, बेबी कॉर्न, फ्लॉवर इत्यादी)
मी घेतलेले प्रमाण:
१/२ कप भोपळी मिरची, उभी पातळ चिरून
१/४ कप बेबी कॉर्न (१/२ इंच तुकडे)
१/४ कप फ्लॉवर (लहान तुरे)
१/४ कप गाजर, उभे पातळ चिरून (१ इंच)
६ ते ७ बटाट्याच्या पातळ चकत्या
१/४ कप कांदा उभा पातळ चिरलेला
--
दिड टेस्पून सोयासॉस
१ टेस्पून कॉर्न स्टार्च/कॉर्न फ्लोअर
२ टिस्पून व्हिनेगर
१ टिस्पून चिली सॉस
१ टिस्पून आले पेस्ट
१/२ टिस्पून लसूण पेस्ट
२ सुक्या लाल मिरच्या
१ टेस्पून तेल
साखर, मिठ आणि मिरपूड चवीनुसार
कृती:
१) तांदूळ धुवून घ्यावेत. अर्धा तास निथळत ठेवावे. पातेल्यात पाणी आणि धुतलेले तांदूळ घ्यावे. त्यात तेल आणि थोडे मिठ घालावे. मध्यम आचेवर तांदूळ शिजू द्यावेत. वरून शक्यतो झाकण ठेवू नये त्यामुळे भात चिकट होवू शकतो.
२) प्रथम चिरलेल्या भाज्यांपैकी बेबी कॉर्न, गाजर, फ्लॉवर, बटाट्याच्या पातळ चकत्या अर्धवट शिजवून घ्याव्यात, त्यासाठी २ कप पाणी गरम करत ठेवावे त्यात या भाज्या शिजवून उरलेले १/२ कप पाणी नंतर वापरण्यासाठी ठेवून द्यावे.
३) कढईत तेल गरम करावे. त्यात आलेलसूण पेस्ट परतावी. लाल मिरच्या तोडून घालाव्यात. कांदा घालून अगदी थोडे परतावे. कांदा पूर्ण शिजू देवू नये.
४) नंतर भोपळी मिरची घालून परतावे. अर्ध्या शिजवलेल्या भाज्या घालाव्यात. निट मिक्स करून त्यात सोयासॉस, व्हिनेगर, आणि चिली सॉस घालून ढवळावे.
५) भाज्यांचे उरलेले पाणी घ्यावे व त्यात कॉर्न फ्लोअर मिक्स करावे. हे मिश्रण भाज्यांमध्ये घालावे. यामुळे भाजीला थोडी घट्टसर ग्रेव्ही तयार होईल. नंतर आवडीनुसार मिठ, साखर आणि मिरपूड घालावी.
हि भाजी तयार भाताबरोबर सर्व्ह करावी. भाजीबरोबर शेजवान सॉसही सर्व्ह करावा.
टीप:
१) भाजीत आवडत असल्यास टोफूही वापरू शकतो
Labels:
stir fry vegetables, Chinese stir fry vegetables, stir fried vegetables
Labels:
Bhaji,
Cauliflower,
Indo-Chinese,
Main Dish,
P - T
Chinese stir fried vegetables with Rice
Serves: 2 persons
Ingredients:
::::Rice::::
¾ cup Basmati Rice
1½ to 2 cup water
Salt to taste
1 tsp Oil
::::Vegetables::::
1½ to 1 ¾ cup mix vegetables (Carrot, Onion, Bell Pepper, Baby Corn, Cauliflower etc.)
I had used following vegetables:
½ cup Bell Pepper, sliced Lengthwise
¼ cup Baby Corn (1/2 inch pieces)
¼ cup Cauliflower (small florets)
¼ cup Carrots, thinly sliced (1 inch pieces)
6 to 7 thin slices of Potato (peeled)
¼ cup Onion, sliced lengthwise
--
1 ½ tbsp Soy sauce
2 tsp Vinegar
1 tbsp Cornstarch / Corn Flour
1 tsp Chili Sauce
1 tsp Ginger Paste
½ tsp Garlic Paste
2 dried red Chilies
1 tsp Oil
Sugar, Salt and Pepper to taste
Method:
1) Wash Rice with water and drain. Keep aside for half an hour. Then take a deep pan to cook rice. Add washed rice and water. Put in Oil and salt to taste. Give a stir and let the rice cook on medium heat. Do not cover with lid. Otherwise, rice could become sticky.
2) In a saucepan, boil 2 cups of water. Add Baby corn, Carrot, Cauliflower and potato slices and parboil these vegetables. Once vegetables are half cooked, drain the remaining water and reserve ½ to ¾ cup water for later use.
3) Heat a wok or any nonstick saucepan. Add oil and let it become hot. Then add Ginger-Garlic paste. Put in Red chilies and sauté for few seconds. Add onion and sauté for around 40 seconds. Do not cook Onion completely.
4) Then add Bell pepper fry for a minute. Add half-cooked vegetables and mix well. Also add Soy Sauce, Vinegar and Chili Sauce, give a nice stir.
5) Mix the reserved water and Corn flour together, and add it to fried vegetables. This will help to form nice thick gravy to stir fried vegetables. Then add salt, sugar and pepper to taste. Mix well
Serve hot with Basmati Rice. In addition, serve Sichuan Sauce along with Stir-fried Vegetables
Note:
1) If you are a fan of Tofu, add some while cooking.
Labels:
stir fry vegetables, Chinese stir fry vegetables, stir fried vegetables
Labels:
A to E,
Cauliflower Recipes,
Curry / Kadhi Recipes,
English,
Indo-Chinese Recipes,
Main Dish Recipes,
Sabzi Recipes
ब्रेड रोल - Bread Roll
Bread Roll (English Version)
वाढणी : ५ ते ६ ब्रेड रोल
साहित्य:
५-६ ब्रेडचे स्लाईस (व्हाईट)
१ कप उकडलेल्या बटाटा फोडी
१/४ कप मटार
१/४ कप कांदा, बारीक चिरून
१/४ कप कोथिंबीर, बारीक चिरून
१/२ टिस्पून किसलेले आले
२ हिरव्या मिरच्या, बारीक चिरून
१ टिस्पून गरम मसाला
१/२ टिस्पून आमचुर पावडर
फोडणीसाठी : २ टिस्पून तेल, १/२ टिस्पून जिरे, १/४ टिस्पून हिंग, १/४ टिस्पून हळद, १/२ टिस्पून लाल तिखट
कढीपत्ता
चवीनुसार मिठ
तळण्यासाठी तेल
कृती:
१) बटाटा उकडून, सोलून त्याच्या फोडी करून घ्याव्यात. मटार वाफवून घ्यावेत.
२) कढईत तेल गरम करून जिरे, हिंग, हळद, लाल तिखट घालून फोडणी करावी. फोडणीत कढीपत्ता, हिरव्या मिरच्या आणि आले घालावे. काही सेकंद परतून कोथिंबीर घालावी, कांदा घालावा. थोडे मिठ घालून कांदा शिजेस्तोवर परतावे.
३) नंतर मटार आणि बटाटा घालून परतावे. गरम मसाला, आमचुर पावडर घालून निट मिक्स करावे. मध्यम आचेवर एक वाफ काढावी. गरजेनुसार मिठ व तिखट वाढवावे. भाजी थोडी गार होवू द्यावी.
४) ब्रेड स्लाईसच्या कडा काढून टाकाव्यात. ब्रेड हातात घेऊन त्यावर थोडे पाणी शिंपडावे आणि ब्रेड ओलसर करावा. अधिकचे पाणी ब्रेड दोन्ही हातांमध्ये चेपून काढून टाकावे. ब्रेड काळजीपूर्वक हाताळावा.
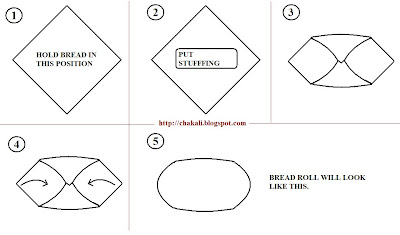
५) या ओलसर ब्रेड स्लाईसच्या मध्यभागी एक ते दिड चमचा भाजी ठेवावी व चित्रात दाखविल्याप्रमाणे फोल्ड करून रोल बनवावा. रोल एकदम छान बांधला गेला पाहिजे. आवरणाच्या फटी राहिल्या तर तेल आत जाईल आणि खाताना रोल तेलकट लागेल.
६) तयार रोल तेलात सोनेरी रंगावर तळून काढावेत.
टोमॅटो सॉसबरोबर गरम गरम सर्व्ह करावेत.
टीप:
१) स्टफिंग आपल्या आवडीनुसार वेगवेगळ्या कॉंम्बिनेशनमध्ये बनवू शकतो.
Labels:
bread roll, veg bread roll, easy bread roll recipe, stuffed bread rolls
Bread Roll
Bread Roll in Marathi
Servings: 5 to 6 bread rolls
Ingredients:
5 to 6 bread slices (white bread)
1 cup small potato cubes (Boiled and peeled)
¼ cup Green Peas
¼ cup Onion, finely chopped
¼ cup Cilantro, finely chopped
½ tsp grated Ginger
2 Green chilies, finely chopped
1 tsp Garam Masala
½ tsp Amchoor Powder (Dry Mango Powder)
For Tempering: 2 tsp Oil, ½ tsp Cumin seeds, ¼ tsp Asafoetida Powder, ¼ tsp Turmeric Powder, ½ tsp Red Chili Powder
4-5 Curry leaves
Salt to taste
Oil for deep-frying
Method:
1) Boil Potato, peel and dice it. boil Green Peas.
2) Heat a wok, add Oil. Let the oil become hot. Then add Cumin seeds, Asafoetida Powder, Turmeric Powder, and Red Chili Powder. Then add Curry Leaves, green Chilies, and Ginger. Sauté for few seconds and add Cilantro. Add Onion and little salt. Let the Onion become translucent.
3) Once Onion is done, add Green Peas and Potato. Stir well. Add Garam Masala, Amchoor Powder. Mix well. Add salt and Chili Powder if needed. Let the stuffing cool down.
4) Now remove the edges of bread. Hold one bread slice as shown in the picture. Sprinkle little water all over the slice. Remove excessive water by squeezing bread slice gently with both hand palms. Do not sprinkle lot of water, it will make bread slice mushy and very difficult to handle.
5) Place 1 or 1 ½ tbsp stuffing on the bread. Fold up and cover the stuffing with damp bread as shown in the picture. If there are any cracks on the cover, the oil will go inside the roll while deep-frying and make the roll too oily. To avoid this, wrap the stuffing completely with bread slice.
6) Heat Oil over medium heat. Deep fry these rolls to Golden brown.
Serve hot with Tomato Sauce.
Note:
1) You can make your choice of Stuffing in any combination.
Labels:
bread roll, veg bread roll, easy bread roll recipe, stuffed bread rolls
-*-*-*-*-*-*-*-*-*-*-*-*-*-*-*-*-*-*-*-*-*-*-*-*-*-*-*-*-*-*-*-*-*-*-*-*-*-*-*-*-*-*
The Genies Return!
My Dear Blogger Friend Madhavi passed me the Magic lamp ! Thanks Madhavi..
Alakazam!
The mighty Genie King and the beautiful Genie Princess from the magical Land of Faraway are back! Upon escaping the clutches of their Evil Master after being held captive for 1000 years, the magical genies have been busy flying on their Magical Flying Carpet, granting wishes and spreading love throughout the blogosphere.
And now, the genies are back with a special gift for everyone! Behold the sacred, Magic Lamp of Luck! With this magic lamp, your blog will enjoy much good luck and fortune, warding off all things evil lurking around in the blogosphere. We would like to share this magic lamp with you so please pass on the Magic Lamp of Luck to those in need of some good luck. Remember, do not be greedy or unkind, evil or vengeful and good luck & fortune will always be with you! Join us on another exciting magical adventure as we spread goodwill and good luck to one and all!
1-Mariuca 2-First Time Dad 3-Mariuca's Perfume Gallery 4-Emila's Illustrated Blog 5-The Other Side of Emila 6-My Sweet Escape 7-Bay Head Blog 8-Roxiticus Desperate Housewives 9-LadyJava's Lounge 10-Petty Ramblings of a Petty Queen 11-The Real Deal 12-Pinay Mommy Online 13-Perpustakaan 14-LadyJava Life's Pages 15-Make Money Online 16-Cat Tales 17-LadyJava's Food Paradise 18-Being Woman 19-Spicybug 20-Biz-N-Honey 21-Aeirin's Collections 22-Sasha Says 23-Project Heavy Traffic 24-Picture Clusters 25-My Wanderings 26-Maiylah's Snippets 27-Moments of Colours 28-Life Quest 29-BigMoneyList 30-The Best Parts 31-Morphed 32-Buhay Pinoy 33-Galatayo 34-Blogging Tips 35-Apples Of The Eyes 36-My Own Utopia 37-Sasha's Corner 38-Under One Roof 39-Say Cheese 40-A Great Pleasure 41-A Life in Bloom 42-Because Life is a Blessing 43-Digiscraptology 44-Xixi 45-Ode to Adrienne 46-CrankyDave 47-Simple Life 48-Dew Drops 49-The Journey 50-Mastering Your PC 51-Day Break 52-A Little Girl Talk 53-Mom Knows Everything 54-Day to Day 55-1 of a Kind Wis 56-It's a woman's world! 57-Breather 58-Photo Hook 59-Letterbox 60-Asian Mutt International 61-Dream Doe Philosophy 62-MommyAlehs Up-Close And Personal 63-Livin' the Life! 64-Restnrileks 65-English Corner 66-English Grammar 67-Bodybuilding & Fitness 68-Everything you need 69-One Stop Games 70-Blockbluster Movie Trailers 71-Bodybuilding & Human Growth Hormone 72-World of Tennis 73-Men's Health & Tips 74-Internet Marketing Strategy & Tips 75-Latest Technology 76-Tentang Binaraga 77-Berita Seputar Selebriti 78-Panduan Kesehatan 79-Insurance For You 80-Crissy's Zone 81-Crissy's Library 82-Crissy's Haven 83-sHeNzEe's wOrLd 84-Voice Of The Spirit 85-Best Cuisine Recipes 86-Stand My Ground 87-SeeNRead 88-This Is A Miracle 89-I AM KCAT 90-Traipsey Turvey 91-GBeX & DOm 92-Spun By A Seanachie 93-ISL Family 94-D' Cooking Mudra 95-'Story' the Great 96-UmmiRosma 97-Munirah Abd 98-Atie 99-Hit-or-Miss 100-Twisted Sister 101-Laketrees Artist 102-Blessed Sanctuary 103-Comedy Plus 104-Blogging By Sandee 105-Living Life to the Fullest 106-Speech-Less 107-Happy Life 108-My Discoveries 109-Strangely Out Of Place 110-Rooms of My Heart 111-The Paper Vision 112-Luxurious Retreats 113-Reef 114-Weekend Snapshot 115-Blessie's Finds 116-Confessions of An Army Wife 117-My Pooch Life 118-Five Martini Lunch 119-TIPS FROM THE TRAILER 120-PoeARTica 121-STAY AT HOME MOM 122-Rantings of a Woman 123-Sjtl's Weblog 124-Turn-u-Off 125-My World in My Own Word 126-Shawie 127-A New Saga 128-Janeth Vicy's Life Journey 129-Simple Reveries 130-Berry Blog 131-Touts4u 132-My So Called Life 133-La Vida es Hermosa 134-Speedcat Hollydale Page 135-mangosteenskin 136-Choc Mint Girl 137-Of Colors And Styles 138-Pinaymama's Diary 139-My Life's Rollercoaster Ride 140-My Life...My Journey! 141-Bonoriau 142-Jenny and Belle 143-Read My Mind 144-A Sweet Taste Of Life 145-Shopping Blog 146-Precious Moments 147-Feydakin 148-Hot Shit Form Here 149-A Mother's Simple Thoughts 150-Daily Ramblings Rendezvous 151-Miss Moneypenny's Comical Posts Undercover 152-My Precious Niche 153-Fun|Fierce|Fabulous 154-Colorful World of Shiela 155-Me,myself+2 156-Ozzy's Mom 157-Let's talk about MJ 158-Great people make us feel we can become great 159-A Family Man 160-Just the way it is... 161-In Depth 162-Attitude, the ULTIMATE POWER 163-Are You Grateful? 164-Complain Complain Complain 165-My Little Black Pot 166-Notes By Marvic 167-Aku Pelukis 168-Jiwasintetik 169-Foster Me Up 170-Life: Thoughts & Inspirations 171-The Callalily Space 172-Mommyhood and Me 173-Bits and Pieces 174-La Place de Cherie 175-Through The Rain 176-Blogfixes 177-New England Lighthouse Treasures 178-Chez Francine 179-Tsinay 180-Hailey's Domain 181-Hailey's Beats and Bits 182-My So-Called Life 183-PinayWAHM 184-Rusin Roundup 185-Sweet Temptation 186-Lynn's Chic Spot 187-Kai Kriye 188-LiLo n StiTcH 189-Lights and Shade 190-Easycrafts 191-Ideasmoney 192-My creations 193-Sukanya-hobbiesandcrafts 194-My Kraft 195-Adam: @geNda | iNsPiRaSi 196-The Working Mom 197-My Touch Of Heaven 198-Her Name is N.O.Y. 199-Fida Abbott 200-Hesitant Wife's Blog 201-Blogging For Fun 202-Paint Your Life 203-Spicybugz World 204-Colin From Life 205-Ramblings of The Phat 206-AngelBaby from Your Caring Angels 207-Creative Saga 208-Indian Khana 209-Me and My Kitchen 210-Mom's Recipies 211-Mom's Cooking 212-Cooking Station 213-Simple Indian Food 214-Rekha's Kitchen 215-SuperNova & SweetPain 216-My Sweet Haven 217-scrapbook newbie 218-Miyyah@Kertas 219-funfliffy 220-AyangLina 221-A Room of Crazy Scrapper 222-srikars kitchen 223-Purva's Daawat 224-Recipe Center 225-Veg Inspirations 226-Little Mermaid 227-Meendum Santhipoom 228-Ranji's kitchen corner 229-En Vittu Virundhu 230-What's on the menu? 231-Dancing in Midlife Tune 232-Meme Me 233-Tasty treats 234-Mummy Diaries 235-notyet100hub 236-Jujubs Creative Corner 237-Crafts and Cooking 238-As Long As I Can Dream 239-A Walk To Remember 240-Empty Streets 241-The time has come 242-Momhood Moments 243-Life is too short to be ordinary 244-Mistress of Spices 245-From the Kitchen 246-Bhawana 247-Easy Cooking 248-Vegetarian Medley 249-Homecooked 250- The Painted Veil 251-Natural Remedies at Home 252-Vaidehi 253-Send Chocolate 254-YOU Next!
I would like to pass this Magic Lamp to -
http://asankhana.blogspot.com : Notyet100
http://purvasdaawat.blogspot.com : Purva Desai
http://tumyumtreats.blogspot.com : Sunshinemom
http://delhibelle.blogspot.com : Rashmi
http://vadanikavalgheta.blogspot.com : Mints
Servings: 5 to 6 bread rolls
Ingredients:
5 to 6 bread slices (white bread)
1 cup small potato cubes (Boiled and peeled)
¼ cup Green Peas
¼ cup Onion, finely chopped
¼ cup Cilantro, finely chopped
½ tsp grated Ginger
2 Green chilies, finely chopped
1 tsp Garam Masala
½ tsp Amchoor Powder (Dry Mango Powder)
For Tempering: 2 tsp Oil, ½ tsp Cumin seeds, ¼ tsp Asafoetida Powder, ¼ tsp Turmeric Powder, ½ tsp Red Chili Powder
4-5 Curry leaves
Salt to taste
Oil for deep-frying
Method:
1) Boil Potato, peel and dice it. boil Green Peas.
2) Heat a wok, add Oil. Let the oil become hot. Then add Cumin seeds, Asafoetida Powder, Turmeric Powder, and Red Chili Powder. Then add Curry Leaves, green Chilies, and Ginger. Sauté for few seconds and add Cilantro. Add Onion and little salt. Let the Onion become translucent.
3) Once Onion is done, add Green Peas and Potato. Stir well. Add Garam Masala, Amchoor Powder. Mix well. Add salt and Chili Powder if needed. Let the stuffing cool down.
4) Now remove the edges of bread. Hold one bread slice as shown in the picture. Sprinkle little water all over the slice. Remove excessive water by squeezing bread slice gently with both hand palms. Do not sprinkle lot of water, it will make bread slice mushy and very difficult to handle.
5) Place 1 or 1 ½ tbsp stuffing on the bread. Fold up and cover the stuffing with damp bread as shown in the picture. If there are any cracks on the cover, the oil will go inside the roll while deep-frying and make the roll too oily. To avoid this, wrap the stuffing completely with bread slice.
6) Heat Oil over medium heat. Deep fry these rolls to Golden brown.
Serve hot with Tomato Sauce.
Note:
1) You can make your choice of Stuffing in any combination.
Labels:
bread roll, veg bread roll, easy bread roll recipe, stuffed bread rolls
-*-*-*-*-*-*-*-*-*-*-*-*-*-*-*-*-*-*-*-*-*-*-*-*-*-*-*-*-*-*-*-*-*-*-*-*-*-*-*-*-*-*
The Genies Return!
My Dear Blogger Friend Madhavi passed me the Magic lamp ! Thanks Madhavi..
Alakazam!
The mighty Genie King and the beautiful Genie Princess from the magical Land of Faraway are back! Upon escaping the clutches of their Evil Master after being held captive for 1000 years, the magical genies have been busy flying on their Magical Flying Carpet, granting wishes and spreading love throughout the blogosphere.
And now, the genies are back with a special gift for everyone! Behold the sacred, Magic Lamp of Luck! With this magic lamp, your blog will enjoy much good luck and fortune, warding off all things evil lurking around in the blogosphere. We would like to share this magic lamp with you so please pass on the Magic Lamp of Luck to those in need of some good luck. Remember, do not be greedy or unkind, evil or vengeful and good luck & fortune will always be with you! Join us on another exciting magical adventure as we spread goodwill and good luck to one and all!
* Start Copy Here*
1. Add your site(s) to the list once you have received the Magic Lamp of Luck.
2. Pass on the Magic Lamp of Luck to as many people as you like. After all, everyone needs some good luck!
3. Leave a comment HERE once you’ve passed on the Magic Lamp of Luck. Once the Genie King and Genie Princess have visited your site to make sure your links are complete and proper, you will then be added to the Master List.
4. To ensure everyone receives equal link benefit, please UPDATE your list regularly!
I would like to pass this Magic Lamp to -
http://asankhana.blogspot.com : Notyet100
http://purvasdaawat.blogspot.com : Purva Desai
http://tumyumtreats.blogspot.com : Sunshinemom
http://delhibelle.blogspot.com : Rashmi
http://vadanikavalgheta.blogspot.com : Mints
Labels:
A to E,
Fried Recipes,
Fritters Recipes,
potato Recipes,
Snack Recipes
रशियन सलाड - Russian Salad
Russian Salad (English Version)
साहित्य:
१/४ कप मटार
१/४ कप गाजर, (सोलून लहान चौकोनी तुकडे)
१/४ कप शिजलेला बटाटा (सोलून लहान फोडी)
१/४ कप पाती कांदा (बारीक चिरून)
१/४ कप काकडी (सोलून लहान चौकोनी फोडी)
१/४ कप टोमॅटो, बारीक चिरून
१/४ कप लाल सफरचंद (चौकोनी लहान फोडी)
१/४ कप अननसाचे तुकडे (चौकोनी लहान फोडी)
२ टेस्पून साखर
१/४ टिस्पून मोहोरी पावडर
२ टेस्पून व्हाईट सॉस
२ टेस्पून मेयॉनिज (एगलेस)
१/४ टिस्पून मिरपूड
कोथिंबीर सजावटीसाठी
कृती:
१) मटार आणि गाजराचे तुकडे वाफवून घ्यावे.
२) व्हाईट सॉस, साखर, मोहोरी पावडर एकत्र करून निट मिक्स करून घ्यावे. सर्व चिरलेल्या भाज्या व फळे एकत्र एका वाडग्यात घ्यावे. व्हाईट सॉस, साखर, मोहोरी पावडरचे मिश्रण त्यात घालून निट मिक्स करावे. मेयॉनिज घालून मिक्स करावे.
३) वरून थोडी मिरपूड घालावी. सर्व्हींग बोलमध्ये घालून फ्रिजमध्ये किमान अर्धा तास थंड करावे. जेवणाच्या वेळी थंड असे रशियन सलाड सर्व्ह करावे.
टीप:
१) जर मेयॉनिज वापरायचे नसेल तर दही सुती फडक्यात बांधून, एक तासभर टांगून ठेवावे. त्यातील पाणी निघून गेले कि घट्टसर भाग मेयॉनिज म्हणून वापरावा. दही शक्यतो फार आंबट नसावे.
Labels:
Russian Salad, Salad Recipe, Russian salad Recipe, quick and easy salad, healthy salad recipe
Russian Salad
Russian salad
Ingredients:
¼ cup green Peas
¼ cup Carrots (peeled, small cubes)
¼ cup Boiled Potato (peeled, small cubes)
¼ cup Scallion, finely chopped
¼ cup Cucumber (peeled and small cubes)
¼ cup Tomato, finely chopped
¼ cup Red Apple, small cubes
¼ cup Pineapple, small cubes
2 tbsp Sugar
¼ tsp Mustard Powder
2 tbsp white sauce
2 tbsp mayonnaise (eggless)
¼ tsp Black Pepper powder
Cilantro for garnishing
Method:
1) Boil Green Peas and Carrot pieces
2) In a mixing bowl, combine white sauce, Sugar, and Mustard Powder. Mix well. Then add all vegetables and fruits. Mix up well. Add Mayonnaise and mix again.
3) Sprinkle little Black pepper. Transfer to serving bowl and refrigerate atleast for half an hour before serving.
Serve chilled Russian salad in your meal.
Mints – vadanikavalagheta.blogspot.com has tagged me and also shared two Awards
“Blogging with Purpose”
“Friendship Award”
I thank my Blogger Friend Mints for sharing these awards with me
I would like to pass “Blogging with Purpose” Award to five of my blogger friends
Sunshinemom
Trupti
Ranji
Notyet100
Madhavi
I would like to pass Frienship Award to
Hetal
Andhra flavors
Rashmi
Divya
Cinnamon
Congratulations for your awards
I am tagged by Mints for answering following five questions..
The Rule is
"At the end of the post, the player then tags 5 or 6 people and posts their names, then goes to their blogs and leaves them a comment, letting them know they’ve been tagged and asking them to read my blog".Let the person who tagged you know when you’ve posted your answers."
1. What was I doing ten years ago?
Enjoying my First year of College Life
2. Five things on Today's "To do" list
Complete this post
Exercise for 30 minutes
Make my desk Clutter free
Prepare nice snack
spend 30 minutes with friends
3. I am addicted to:
Cooking, Eating variety Food
4. Things I would do if I were a billionaire:
I will go to world tour with my family and try variety food.
5. Places I have lived:
Mumbai, Pune, Florida
I am tagging:
Sunshinemom
Trupti
Madhavi
Ranji
Andhra flavors
Rashmi
तवा पुलाव - Tava Pulav
Tawa Pulao (English Version)
वाढणी : २ जणांसाठी
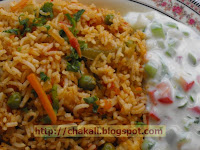
हा चमचमीत तवा पुलाव चविष्ट अशा रायत्याबरोबर खा आणि खिलवा !!!
साहित्य:
:::: भातासाठी ::::
१ टिस्पून + १ टिस्पून बटर
३/४ कप बासमती तांदूळ
दिड ते पाउणेदोन कप पाणी
मिठ
:::: मसाला ::::
गाजर : १/८ कप पातळ चिरलेले (१ इंच तुकडे)
भोपळी मिरची: १/४ कप पातळ उभी चिरलेली (१ इंच तुकडे)
फ्लॉवरचे तुरे अर्धे शिजवलेले : १/४ कप
कांदा : १/४ कप बारीक चिरून १/८ कप उभा चिरून
टॉमेटो : १/२ कप बारीक चिरून
शिजवलेला बटाटा : १/८ कप बारीक फोडी
वाफवलेले मटार : १/४ कप
दिड टिस्पून लसूण पेस्ट
१/२ टिस्पून जिरे
दिड टिस्पून लाल तिखट
२ टिस्पून बटर
१ टिस्पून पावभाजी मसाला
खडा मसाला : १ लहान तुकडा दालचिनी, २ लवंगा, १ तमाल पत्र, १ वेलची
सजावटीसाठी चिरलेली कोथिंबीर
कृती:
१) बासमती तांदूळ धुवून १० मिनीटे निथळत ठेवावा. नंतर १ टिस्पून बटर नॉनस्टिक भांड्यात गरम करावे त्यावर बासमती तांदूळ २ ते ३ मिनीटे परतावा. नंतर दिड ते पाउणेदोन कप पाणी घालावे. थोडे मिठ घालावे. मिडीयम लो फ्लेमवरती झाकण न ठेवता भात शिजवावा. मधेमधे ढवळावा. भात शिजला कि एका ताटात किंवा परातीत तो मोकळा करावा. थोडे बटर शिजलेल्या भाताला लावून घ्यावे. वरून बटर घातल्याने भाताला छान तकाकी येते. हे करताना भाताची शिते मोडणार नाहीत याची काळजी घ्यावी.
२) नंतर नॉनस्टिक तवा मध्यम आचेवर गरम करावा. त्यात २ टिस्पून बटर घालावे. लगेच जिरे घालावे. जिरे तडतडले कि लसूण पेस्ट आणि लाल तिखट घालावे. ३० सेकंद परतावे.
३) कांदा घालून थोडे परतावे. कांदा थोडा शिजला कि भोपळी मिरची आणि गाजर घालावे. साधारण २ ते ३ मिनीटे परतावे. भाज्या अगदी पूर्ण शिजवू नयेत.
४) नंतर फ्लॉवरचे तुरे, टॉमेटो घालून १-२ मिनीटे परतावे. नंतर मटार, बटाटा आणि पावभाजी मसाला घालावा. चवीनुसार मिठ घालावे. पावभाजीला करतो तशा या भाज्या आपण मॅश करणार नाही आहोत कारण पुलावमध्ये भाज्या दिसल्या पाहिजेत.
५) हि भाजी तयार झाली कि ती तव्याच्या एका कडेला करून घ्यावी. तव्याच्या रिकाम्या भागात १/२ टिस्पून बटर घालावे त्यात खडामसाला घालावा. १० - १५ सेकंद परतून भाजी त्यात मिक्स करावी. जर आपण खडा मसाला आधीच फोडणीत घातला असता तर त्याचा स्वाद गरजेपेक्षा जास्त उतरला असता. म्हणून भाजी झाल्यावर शेवटी खडा मसाल्याची फोडणी करून भाजीत मिक्स करावी.
६) भाजी झाली कि गॅस मिडीयम हायवर ठेवावा. या भाजीत तयार भात घालावा. भाताचे ४ भाग करून एकेक भाग भाजीत घालावा म्हणजे सर्व भाताला भाजी लागेल आणि निट मिक्स होईल. तव्यावर हा भात छान परतून रायत्याबरोबर गरम गरम सर्व्ह करावा.
Labels: tawa Pulao, Mumbai Tawa Pulav, Pulav recipe, Tawa recipe, pavbhaji pulav, spicy pulao recipe
Labels:
Bhatache Prakar,
Main Dish,
North Indian,
P - T,
Tava
Tawa Pulao
Tawa pulav in Marathi
Serves : 2 persons
Serve this spicy Tawa Pulao with Flavorsome Raita
Ingredients:
::::Rice::::
1 tsp + 1 tsp Butter
¾ cp Basmati Rice
1½ to 1¾ cup water
1 tsp salt
::::Masala::::
Carrots: 1/8 cup thinly sliced (1” pieces)
Bell Pepper: ¼ cup thinly sliced (1” pieces)
Cauliflower: ¼ cup, half cooked
Onion: ¼ cup finely chopped and 1/8 cup thinly sliced
Tomato: ½ cup finely chopped
Boiled and peeled Potato: 1/8 cup, 1/2 inch cubes
Steamed Green Peas: ¼ cup
1½ tsp Garlic Paste
½ tsp Cumin seeds
1½ tsp Red Chili Powder
2 tsp Butter
1 tsp Pavbhaji masala
Whole Masala : 1 small Cinnamon stick, 2 Cloves, 1 Bay leaf, 1 Cardamom
Cilantro for Garnishing
Method:
1) Wash Basmati Rice and drain water completely. Keep aside for 10 minutes. Then heat a nonstick pan (take a deep saucepan). Add 1 tsp butter and let it melt. Then add washed rice and stir for 2-3 minutes. Then add 1½ to 1¾ cup water. Add salt to taste. Turn the heat to medium low and let the rice cook uncovered. Stir occasionally. Once rice is done, transfer cooked rice to a bigger plate to cool down. Spread rice on the plate; let it cool down a little. The drizzle 1 tsp butter over it and gently spread it to all over the rice. Butter will help to make the rice grains separate from each other and it gives nice glaze to the rice. Do it very carefully, harsh handling could mash the rice grains and you will not get the desired texture of rice.
2) Then heat a nonstick Tawa over medium heat. Add 2 tsp butter; let it melt down. Then add Cumin seeds, Garlic Paste and red Chili Powder. Sauté for approximately 20-30 seconds.
3) Add Onion and sauté. Once Onion is done, add Bell Pepper and Carrots. Sauté for 2-3 minutes. Do not overcook.
4) Add Cauliflower, Tomato. Stir well and let it cook for 1-2 minutes. Add Green Peas, Potato and Pavbhaji Masala. Add salt to taste. Do not mash these vegetables as we do while making Pavbhaji. Because, we are going to make Pulao by using these vegetables.
5) Once this Masala Bhaji is done, place it to one side of tawa. Add ½ tsp butter on the empty space of Tawa, add Whole Masala to it. Saute for 10-15 seconds and mix it with the Tawa Bhaji. Then sauté for a minute. If we add whole Masala in the starting (with Cumin seeds), we would get overwhelming flavor of this Masala. To avoid it, we will add it at the end.
6) Heat this Tawa Bhaji over high heat. Add rice. Divide rice into 4 parts. Add one part at a time. Mix well and then add another one. It will help to spread Tawa Bhaji to entire rice. Stir well. Garnish with chopped Cilantro and serve hot with Raita.
Labels:
Tawa Pulao, Mumbai Tawa Pulav, Pulav Recipe, Tawa Recipe, Pavbhaji Pulav, Spicy Pulao recipe
दह्यातील रायते - Dahi Rayate
रायते (English Version)
साहित्य:
काकडी : १/४ कप (सोलून चोचवणे)
कांदा : १/८ कप, बारीक चिरून
सिमला मिरची: १/४ कप, एकदम लहान चौकोनी तुकडे
टोमॅटो : १/४ कप, एकदम बारीक चिरून
३/४ कप दही (Fatfree)
१/८ कप दूध (Skimmed)
१ हिरवी मिरची बारीक चिरून
कोथिंबीर : २ टेस्पून बारीक चिरून
१/४ टिस्पून साखर
१/८ टिस्पून चाट मसाला
१/८ टिस्पून जिरेपूड
चवीनुसार मिठ
कृती:
१) सोललेली काकडी, कांदा, सिमला मिरची आणि टोमॅटो एकाच आकारात बारीक चिरून घ्यावे.
२) दही घोटून घ्यावे. दही पातळ करण्यासाठी पाणी न वापरता दूध वापरावे ज्यामुळे रायतं पांचट लागणार नाही. घोटलेल्या दह्यात दूध घालून ते थोडे पातळ करून घ्यावे.
३) या दह्यात कोथिंबीर, साखर, चाट मसाला, जिरेपूड, चवीनुसार मिठ घालावे व निट मिक्स करून घ्यावे.
४) दह्याच्या मिश्रणात चिरलेले काकडी, कांदा, सिमला मिरची आणि टोमॅटो घालून ढवळावे. फ्रिजमध्ये थंड करण्यस ठेवावे.
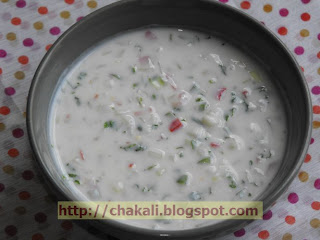
हे रायते तवा पुलावबरोबर खुप मस्त लागते.
Labels:
Dahi Raita, Yogurt Raita, Dahyatli Koshimbir, Indian salad Recipe, Mix veg salad, Mix veg Raita recipe
Yogurt Raita
Raita
Ingredients:
Cucumber: ¼ cup (Peeled and finely chopped)
Onion: 1/8 cup, finely chopped
Bell Pepper: ¼ cup, small cubes
Tomato: ¼ cup, finely chopped
¾ cup Yogurt (Fat free)
1/8 cup Milk (Skimmed)
1 Green chili, finely chopped
2 Tbsp Cilantro finely chopped
¼ tsp Sugar
1/8 tsp Chat masala
1/8 tsp Cumin Powder
Salt to taste
Method:
1) Keep ready chopped Cucumber, Onion, Bell Pepper, and Tomato.
2) Take Yogurt in a bowl. Whisk and make it smooth. Add milk and whisk again to mix well. We are using Milk, not water to make yogurt little thin consistency. Use of water will reduce the taste of Raita.
3) Add chopped Cilantro, chopped Green Chili, Sugar, Chat Masala, Cumin powder, and salt to whisked Yogurt. Mix well.
4) Then put chopped Cucumber, Onion, Bell Pepper, and Tomato. Mix, Cover and chill for one hour before serving.
Serve with any Masala Rice dish. Specially, it tastes great with Tawa Pulao.
Labels:
Yogurt Raita, indian Raita recipe, Mix Raita recipe, Indian Salad Recipe
Labels:
Oil Free Recipes,
P to T,
Salad Recipes,
Side Dish Recipes
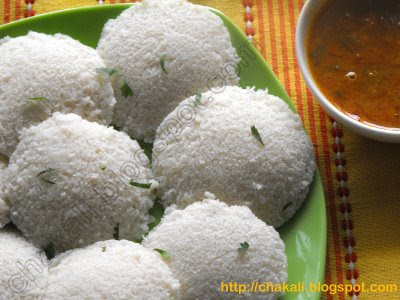
Idli Sambar recipe
Idli in Marathi
Ingredients:
1/2 cup Urad Dal
1 & 1/2 cup Idli Rava
Salt to taste
1/4 cup Pressed Rice (thin variety)
1 tsp Sugar
Method:
1) Soak Idli Rava and Urad Dal separately for 5 hours. Do not add too much water to Idli rava, add only enough to soak the Rava. Add Pohe to soaked rava.
2) After 5 hours drain water from urad dal. Grind to very smooth paste. Add little water if needed. Paste should be very fine and smooth. Then add Rava, sugar and salt to the grinder. Grind it with urad dal paste. Transfer it to another Pot. Take a deep pot as the mixture will rise after fermentation. Cover and set aside in warm place for 10 to 12 hours.
3) Once batter is well fermented, stir in one direction. Grease Idli molds with little oil. Fill them 3/4 with the batter. Take Idli cooker, add water (fill upto 2 inches) and let it heat up. If you are using normal pressure cooker, remove the weight before using, as we want to steam cook, not to pressure cook.
4) Once water starts bubbling, place the filled Idli stand, cover with lid and steam cook for 12 to 15 minutes. Turn the heat off and let the cooker stand for 5 minutes. Scoop out idlis by using knife of sharp edged spoon.
Serve hot with Coconut chutney or spicy Sambar.
Note:
Cold climate is unsuitable for fermentation. In that case, preheat over 250 F for 3 minutes. Turn off the oven and put the batter covered in the oven. and let it sit in the oven for 8 to 10 hours for fermentation.
Labels:
Breakfast Recipes,
English,
F to J,
Snack Recipes,
South Indian Recipes
Subscribe to:
Posts (Atom)